
With V12 there is a new function Automatic class mapping: Edit.... [Automatic class mapping: edit...]
![Dialog: Edit automatic class mapping [Edit Automatic Class Mapping]](https://webapi.partcommunity.com/service/help/latest/pages/cn/installation_ecatalogsolutions/doc/resources/img/img_23868916d0684300addaa759ae3c8f6a.png)
In the following example, a class characteristic of the CNS classification is to be mapped to a class characteristic of the ECLASS 9 .1 classification. This means that the class data is entered starting in the upper table ( mapping between classes [Mapping between classes] ) and then the characteristic data is entered in the lower table (mapping between characteristics [Mapping between characteristics] ).
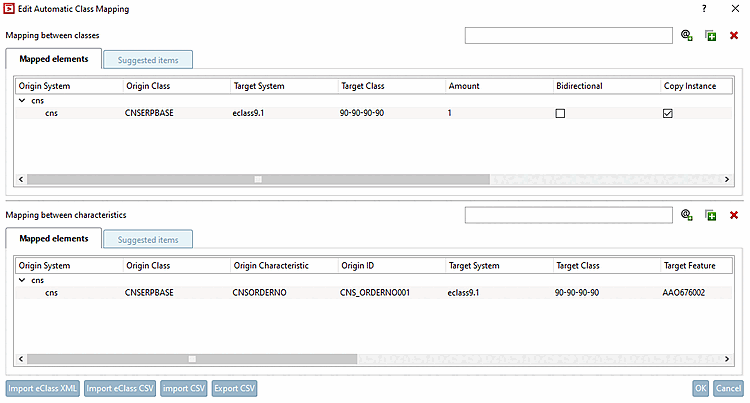
In the upper table, click on
 Add system [Add System].
-> The same-named dialog box is opened.
Enter the name of the desired classification in the exact wording in lower case and confirm with .
Target system [Target System]: Enter the name of the desired classification in the exact wording, in lower case, and confirm with Enter.
Target class [Target Class]: Open the list field and select the desired class.
Number: One instance is created by default. You could also create several instances of the class.
Bidirectional: By default, mapping only takes place in the specified direction. If you activate the option, mapping is performed from the source class [Origin Class] to the target class [Target Class] and vice versa.
Copy instance [Copy Instance]: The entire content of the class is copied.
Copy characteristics [Copy features]: All exactly the same features are copied. This option excludes entries in the lower table.
Copy mapped characteristics [Copy mapped features] (default): Only the characteristics that are explicitly specified in the table below are mapped.
Enter the name of the desired classification in the exact wording in lower case and confirm with .
Origin class [Origin Class]: Open the list field and select the same class as in the table above. Alternatively, you can also use the wildcard symbol (*), although this has a negative impact on performance.
Origin Characteristic: Open the list field and select the desired attribute.
Target system [Target System]: Enter the name of the desired classification in the exact wording, in lower case, and confirm with Enter.
Target class [Target Class]: Open the list field and select the desired class.
Target feature [Target Feature]: Open the list field and select the desired feature.
Copy characteristic name [Copy Characteristic Name] ("Copy variable name"): Select this option if a specific variable is to be mapped.
Copy feature value [Copy Characteristic Value]: Select this option if a fixed value is to be mapped.
Value mapping [Value Mapping] (optional): Click on the button
 button if you want to adjust the original value.
-> The same-named dialog box is opened.
You can adjust the target value by making entries under Source value [Original Value] and Target value [Target Value]. After confirming with , the appearance of the button changes to
 .
.Target unit [Objective Unit] (optional): If a unit is specified, the values are automatically converted.
Execute the mapping by clicking on .

![[Note]](https://webapi.partcommunity.com/service/help/latest/pages/cn/installation_ecatalogsolutions/doc/images/note.png)
![Values mapping [Value Mapping] "Dialog box"](https://webapi.partcommunity.com/service/help/latest/pages/cn/installation_ecatalogsolutions/doc/resources/img/img_841fd3d36fad4a72b31f44556ca22a82.png)

![The same project shows a mapping from "Mapped elements [Mapped elements]" in ECLASS 9.1](https://webapi.partcommunity.com/service/help/latest/pages/cn/installation_ecatalogsolutions/doc/resources/img/img_a5d1f4f1fc644776ad4a8c54aef2e9d5.png)
You can find details on this under Section 5.12.15, “ Automatic Class Mapping: Edit... ” in eCATALOG 3Dfindit