
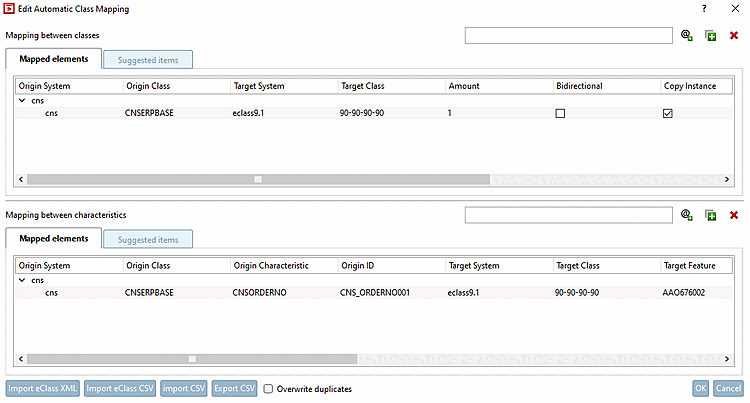
With V12 there is a new function Automatic class mapping: Edit.... [Automatic class mapping: edit...]
![Dialog: Edit automatic class mapping [Edit Automatic Class Mapping]](https://webapi.partcommunity.com/service/help/latest/pages/cn/partsolutions_user/doc/resources/img/img_f1e620ea1368416eb831ac39372b6467.png)
An important difference to the existing Mapping class systems [Map class systems] function is that virtual mapping takes place here, so that although the mapped classes and features are transferred to the target systems during export, the classification data is not physically written to the project files.
![[Note]](https://webapi.partcommunity.com/service/help/latest/pages/cn/partsolutions_user/doc/images/note.png)


![Mapping from "Suggested elements [Suggested items] "](https://webapi.partcommunity.com/service/help/latest/pages/cn/partsolutions_user/doc/resources/img/img_84c19dab387a45baa5276520e34dd261.png)
![Mapping from "Mapped elements [Mapped elements] "](https://webapi.partcommunity.com/service/help/latest/pages/cn/partsolutions_user/doc/resources/img/img_21507c322abc4ae4a5902e4229306726.png)
In the following example, a class characteristic of the CNS classification is to be mapped to a class characteristic of the ECLASS 9 .1 classification. This means that the class data is entered starting in the upper table ( mapping between classes [Mapping between classes] ) and then the characteristic data is entered in the lower table (mapping between characteristics [Mapping between characteristics] ).
In the upper table, click on
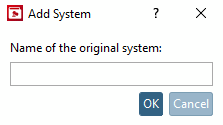
 Add system [Add System].
-> The same-named dialog box is opened.
Enter the name of the desired classification in the exact wording in lower case and confirm with .
Target system [Target System]: Enter the name of the desired classification in the exact wording, in lower case, and confirm with Enter.
Target class [Target Class]: Open the list field and select the desired class.
Number: One instance is created by default. You could also create several instances of the class.
Bidirectional: By default, mapping only takes place in the specified direction. If you activate the option, mapping is performed from the source class [Origin Class] to the target class [Target Class] and vice versa.
Copy instance [Copy Instance]: The entire content of the class is copied.
Copy characteristics [Copy features]: All exactly the same features are copied. This option excludes entries in the lower table.
Copy mapped characteristics [Copy mapped features] (default): Only the characteristics that are explicitly specified in the table below are mapped.
Enter the name of the desired classification in the exact wording in lower case and confirm with .
Origin class [Origin Class]: Open the list field and select the same class as in the table above. Alternatively, you can also use the wildcard symbol (*), although this has a negative impact on performance.
Origin Characteristic: Open the list field and select the desired attribute.
Target system [Target System]: Enter the name of the desired classification in the exact wording, in lower case, and confirm with Enter.
Target class [Target Class]: Open the list field and select the desired class.
Target feature [Target Feature]: Open the list field and select the desired feature.
Copy characteristic name [Copy Characteristic Name] ("Copy variable name"): Select this option if a specific variable is to be mapped.
Copy feature value [Copy Characteristic Value]: Select this option if a fixed value is to be mapped.
Value mapping [Value Mapping] (optional): Click on the button
 button if you want to adjust the original value.
-> The same-named dialog box is opened.
You can adjust the target value by making entries under Source value [Original Value] and Target value [Target Value]. After confirming with , the appearance of the button changes to
 .
.Target unit [Objective Unit] (optional): If a unit is specified, the values are automatically converted.
Execute the mapping by clicking on .
![Values mapping [Value Mapping] "Dialog box"](https://webapi.partcommunity.com/service/help/latest/pages/cn/partsolutions_user/doc/resources/img/img_b001baae85694cf9a015ee1ebd663dff.png)
In this example, a mapping between
Klassfikation "CNS" > Klasse "CNSERPBASE" > Merkmal "CNSORDERNO"
Klassfikation "ECLASS 9.1" > Klasse "27-29-13-90" > Merkmal "AAO676002"
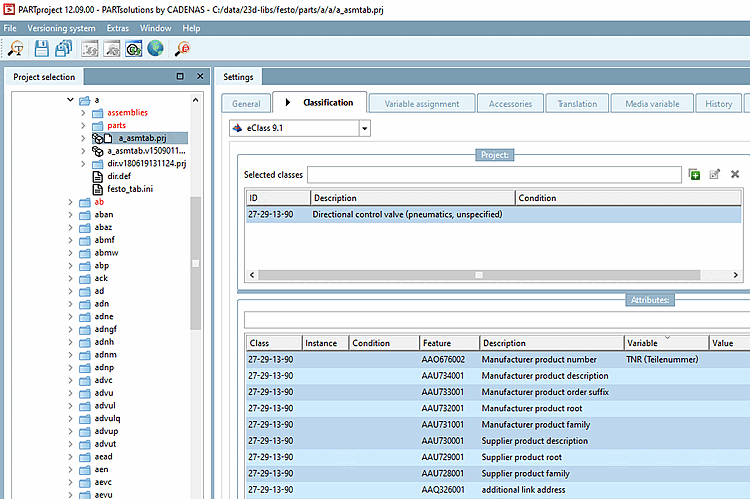
Select a component with the corresponding origin class [Origin Class] and origin characteristic [Origin Characteristic].
In the list field below the Classification tab, select the desired classification to which the mapping has been set up.Jpara
-> The mapped classes and features are displayed with a blue background color.
Main features are the "table area" at the top (for Class Mapping) and the "table area" at the bottom (for Attribute Mapping).
Each table area has 2 tabs, one for mapped elements [Mapped elements] and one for suggested elements [Suggested items]. These are separate tables with separate data.
Each "table area" has it's own buttons. They work on the current active tab.
Buttons on the right above the tables

-
system
Add [Add System]: Adds a source system (e.g. ECLASS 8.0,
ECLASS 8.1, etc.). (Duplicates are not possible.)
-
Add element [Add Item]: Adds a new element with empty data and default values under a top node.
Element is inserted at last position under current selected Top Node or current selected element.
 Remove: Deletes the currently selected element or top node (alternatively also delete button)
When deleting a Top Node all elements under the Top Node will be deleted, too. So there is a dialog for asking the user if he really wants to delete it.

Each table area has its own search bar for searching all source and target data (system and classes (and variables and ID if variables are searched)).

Import eClass XML: Imports ECLASS data from a directory with suitable .xml files (legacy case)
Import eClass CSV: Imports ECLASS data from a directory with suitable csv files (upgrade to next ECLASS version)
Import CSV: Imports ECLASS data from a directory with suitable csv files (e.g. ECLASS 8.0_classes_mapped.csv).
Optionally activate the Overwrite duplicates checkbox: This allows existing mappings to be replaced with new content without additional effort.
Export CSV: Exports table data in the form of several csv files () to a directory (like import format above)
The exported CSV files are separated according to classification system, class data / variable data and mapped / suggested (e.g. ECLASS 5.1_classes_mapped.csv or ECLASS 5.1_variables_suggested.csv).
When importing data (via .csv files), duplicates are removed (may take some time).
When exporting data (via .csv files), duplicates are removed (only changed Elements will be checked).
When saving data (via the button), duplicates are removed (only changed elements are checked) and variable mapping data is checked for missing corresponding class mapping data. In the event that elements are found, there is a dialog where either missing class mapping data can be added or incorrect variable mapping data can be deleted.
Normally the table cells are editable strings or checkboxes.
Some cells give you a List of possible string values, when clicked (e.g. source class if source system is existing).
In the table Mapping between features [Mapping between characteristics], in the column Values mapping [Value Mapping] there is a button in the table cell
 (), which opens a special dialog. Here, source values (several if required) can be mapped to target values (warning if it is a duplicate). The value is therefore changed in the mapped variable or the fixed value is changed.
Target unit [Objective Unit]: If the field is activated, the unit is converted. If values exist, they are automatically converted to the new unit.
There are classes without attributes. In this case, entries in the lower table are obsolete. The reverse case is not possible. The upper table always has to contain entries.