
![[Note]](https://webapi.partcommunity.com/service/help/latest/pages/cn/installation_ecatalogsolutions/doc/images/note.png) | Note |
|---|---|
For
PARTdataManager will increase the visibility
ALL toolbars, buttons, menus and menu entries via the
Configuration files The configuration of ERP toolbar and menu is role dependent. In the following the most important for the configuration of ERP toolbar with buttons and ERP menu with entries is explained. The control concept for 3Dfindit differs from this. See Section 5.9, “ERP buttons and menu items (3Dfindit) ”. | |
At first you will find a short instruction and in the following a listing with all toolbar buttons and menu items together with the according tweak command.
In the configuration file
menustructure_PARTdataManager.cfgconfiguration file, the ERP toolbar and menu are already declared with the following commands:.Excerpt from
$CADENAS_SETUP/menustructure_PARTdataManager.cfg[Tweakmenu] toolbarOrderTop=Standard,Assembly,Details,Export,\n,Views,LinkDatabase,Addsap,
 Classification,IndexTree
toolbarOrderRight=
toolbarOrderLeft=
toolbarOrderBottom=
#Toolbars
...
LinkDatabaseToolbar=MainWindow/LinkDatabase
LinkDataBaseToolbarTitle=Link database
LinkDatabaseToolbarContent=LinkDbLogin,LinkDbChangeGroup,CallLinkMgr,LinkDbSendMail,
LinkDbAddToDb,LinkDbClassify,LinkDbShowLegend,PreferredRanges,erp_psol_mm_vars,
show_dbdata,SORTTABLE,erp_dbedit,DisplayMatButton,ChangeMatButton,SearchMatButton,
erp_sap_showdis
LinkDatabaseToolbarButtonStyle=
AddSapToolbar=MainWindow/Addsap
AddSapToolbarTitle=Sap
AddSapToolbarContent=sap
AddSapToolbarButtonStyle=
#Menus
...
ErpMenuName=ErpMenu
ErpMenuTitle=ERP
ErpMenuContent=LinkDbLogin,LinkDbChangeGroup,CallLinkMgr,LinkDbBackToMgr,
LinkDbCancelBackToMgr,LinkDbSendMail,LinkDbAddToDb,LinkDbClassify,LinkDbShowLegend,
PreferredRanges,erp_psol_mm_vars,show_dbdata,SORTTABLE,erp_dbedit,DisplayMatButton,
ChangeMatButton,SearchMatButton,erp_sap_showdis
Classification,IndexTree
toolbarOrderRight=
toolbarOrderLeft=
toolbarOrderBottom=
#Toolbars
...
LinkDatabaseToolbar=MainWindow/LinkDatabase
LinkDataBaseToolbarTitle=Link database
LinkDatabaseToolbarContent=LinkDbLogin,LinkDbChangeGroup,CallLinkMgr,LinkDbSendMail,
LinkDbAddToDb,LinkDbClassify,LinkDbShowLegend,PreferredRanges,erp_psol_mm_vars,
show_dbdata,SORTTABLE,erp_dbedit,DisplayMatButton,ChangeMatButton,SearchMatButton,
erp_sap_showdis
LinkDatabaseToolbarButtonStyle=
AddSapToolbar=MainWindow/Addsap
AddSapToolbarTitle=Sap
AddSapToolbarContent=sap
AddSapToolbarButtonStyle=
#Menus
...
ErpMenuName=ErpMenu
ErpMenuTitle=ERP
ErpMenuContent=LinkDbLogin,LinkDbChangeGroup,CallLinkMgr,LinkDbBackToMgr,
LinkDbCancelBackToMgr,LinkDbSendMail,LinkDbAddToDb,LinkDbClassify,LinkDbShowLegend,
PreferredRanges,erp_psol_mm_vars,show_dbdata,SORTTABLE,erp_dbedit,DisplayMatButton,
ChangeMatButton,SearchMatButton,erp_sap_showdisUsing LinkDatabaseToolbarContent (and AddSapToolbarContent ) and ErpMenuContent, you decide which elements should always be available, regardless of the role-specific visibility.
Create roles and types of roles
In the configuration file
menuvisibility_PARTdataManager.cfgyou define all the required roles and types of roles, i.e. what should be displayed for which role in PARTdataManager.Excerpt from
$CADENAS_SETUP/menuvisibility_PARTdataManager.cfg[ROLES] LOC1=TYP_B LOC2=TYP_C LOC3=TYP_A ECAT1=TYP_A ECAT2=TYP_A ECAT3=TYP_A ECAT4=TYP_A ECAT5=TYP_A ECAT6=TYP_A
Configure the needed roles and types following the above schema. May be there are 20 different roles, but only 3 different types of roles.
Assign individual commands to role types
Now specify the desired GUI elements for each role type. See following example. The ERP elements are highlighted in red.
Excerpt from
menuvisibility_PARTdataManager.cfg[TYP_A] LayoutResetDefault=true ViewPart=true View2D=true ... ... LinkDbLogin=true LinkDbChangeGroup=true LinkDbBackToMgr=true LinkDbCancelBackToMgr=true LinkDbSendMail=true LinkDbAddToDb=true LinkDbShowLegend=true [TYP_B] LayoutResetDefault=true ViewIndextree=true ViewPart=true View2D=true ... ... LinkDbLogin=true LinkDbChangeGroup=true LinkDbBackToMgr=true LinkDbCancelBackToMgr=true LinkDbSendMail=true LinkDbAddToDb=true LinkDbShowLegend=true [TYP_C] LayoutResetDefault=true ViewIndextree=true ViewPart=true View2D=true ... ... LinkDbLogin=true LinkDbChangeGroup=true LinkDbBackToMgr=true LinkDbCancelBackToMgr=true LinkDbSendMail=true LinkDbAddToDb=true LinkDbShowLegend=true


The following listing shows tooltip, tweak command and function for each button or menu entry.[75]
In order to be able to work with the ERP/PDM integration a connection to the database has to be established.
If automatic login is not activated, the dialog for user authentication appears after starting PARTdataManager.
Enter your user name and password here. If the connection does not exist or has been terminated for any reason, you can call up the Database login dialog box again using this button.
Furthermore the user can call the dialog in order to log in as another user.
LinkDbChangeGroup If several roles are provided for a user, this button should also appear for a role change.
The currently set user and the currently set role are displayed in the PARTdataManager at the bottom of the status bar.
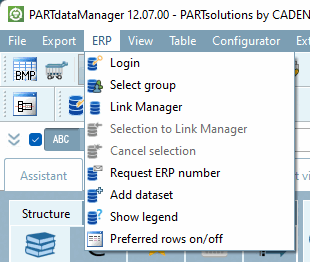
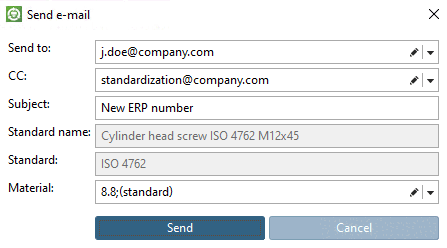
Request [Request ERP number per e-mail] an ERP number by e-mail:
Click on the Request ERP number by e-mail [Request ERP number per e-mail] button to open a dialog box and request approval for parts that are blocked for export by e-mail from the responsible department.
To establish the functionality, please enter the mail server in the configuration file under
$CADENAS_SETUP/plinkcommon.cfgenter the mail server. This is the most important setting. You will also find other setting options. See the [HELP] texts in the configuration file itself. The setting applies to all roles.[MAIL] TEMPLATE=$CADENAS_SETUP/linkdbtemplate_$(CADENAS_LANGUAGE).html SENDTO=name@company.com SUBJECT=Neue ERP-Nummer SERVER= ;...Under
$CADENAS_SETUP/plinkgroups.cfgyou can overwrite the role-specific entry.[Rolename] SENDTO= SUBJECT= SERVER=Information on extending the dialog can be found under Section 5.12, “ Design "New ident number " dialog box - erpcustom.cfg -> Block [USERDIALOG] ”
The e-mail sent contains a .psmid file as an attachment. Double-click on this file to open PARTdataManager with the corresponding project and line.
The e-mail itself contains all the important information about the part, including the MIDENT ("Internal identification of the part"), which uniquely identifies a part. See also Section 2.1.16.2.6.9, “ Open part by MIDENT ” in PARTsolutions - User.
The last line contains a batch command with which the component can also be opened in the PARTdataManager can be opened.
Add data record to link database [Add dataset to link database] opens the following window:
The input fields can be extended as required. See the following illustration. Further information on this can be found in the Section 5.12, “ Design "New ident number " dialog box - erpcustom.cfg -> Block [USERDIALOG] ”
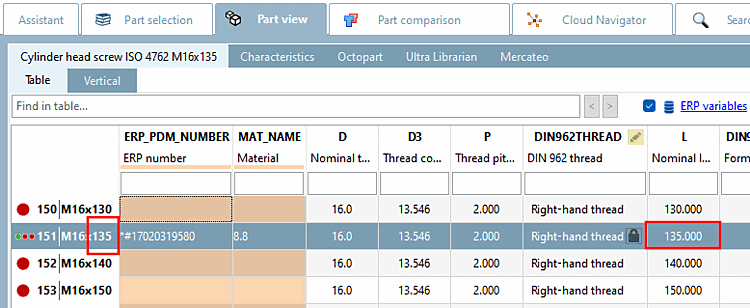
Add dataset to link database (variant)
Choose a data set, which is the very next to the variable to be changed.
After clicking the button, the Create variant window opens.
All variables of the component are listed.
In the example opposite, D was set from 20 to the value 22.
The same dialog as for Add record to link database [Add dataset to link database] (see above) then appears.
As a result, the created variant is also displayed in the PARTdataManager is displayed.
The erp_psol_mm_vars script must be activated in order to have the Add data record to link database (variant) [Add dataset to link database (variant)] function available in the ERP toolbar (regardless of the view display ).
In PARTadmin -> Category Configuration files -> $CADENAS/SETUP/erpcustom.cfg -> Block [LOAD], execute the context menu command Activate on the respective key and save. (If the key does not exist, create it with a consecutive number.) To make the button visible, you must PARTdataManager must be restarted.
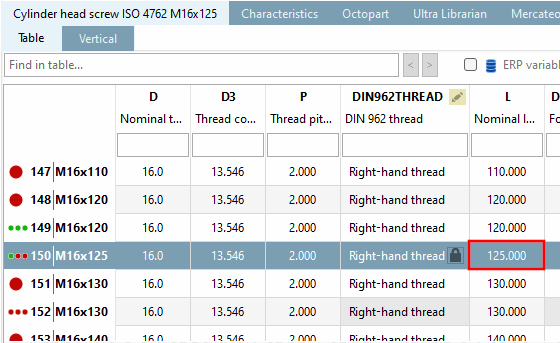
When creating variants, they may not be sorted correctly (see figure above). However, you can set up a dialog to change the sort order of variants in the PARTdataManager table. This eliminates the need to edit the PRJTABLE manually. See Specify sort order for currently open project [Set the sorting order for currently opened project].
When creating variants (see
 ) often they are not correctly sorted. However,
you can configure that a dialog is displayed where you can specify the
sorting order for the PARTdataManager table. Thereby manual editing is
obsolete.
) often they are not correctly sorted. However,
you can configure that a dialog is displayed where you can specify the
sorting order for the PARTdataManager table. Thereby manual editing is
obsolete.To do this, activate the key in the configuration file under
$CADENAS_SETUP/erpcustom.cfgin theADDTODB_VARSblock, activate the key with the value$CADENAS_SETUP/scripts/erp/erp_sorttable.vbbif the key is not available, please enter it yourself.You can find user information on this under Section 2.1.11.12, “Line sorting in PARTdataManager ” in PARTsolutions - User.
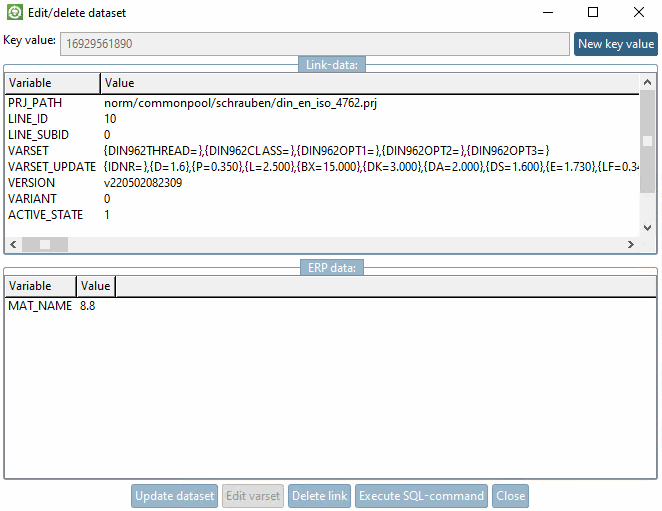
Edit/delete data [Edit/delete dataset] record:
After clicking on the button, the dialog box Edit/delete data record [Edit/delete dataset] appears.
The data view is divided into link data [Link-data] and ERP data.
Click on the value to be changed, change it accordingly and press the button.
Deletes the data of the LINKTABLE.
Afterwards follows an inquiry whether or nor the data of the ERPTABLE should be kept. Confirm/deny the inquiry accordingly.
Opens the window of the same name.
In the SQL command entry field you can enter any command.
Define the maximum number of rows in the result.
The script $CADENAS _SETUP/scripts/erp/erp_dbedit .vbb must be activated in order to have the Edit/delete data record [Edit/delete dataset] function available in the ERP toolbar (regardless of the view display ).
In PARTadmin -> Category Configuration files -> $CADENAS/SETUP/erpcustom.cfg -> Block [LOAD], execute the context menu command Activate on the respective key and save. (If the key does not exist, create it with a consecutive number) To make the button visible, you must PARTdataManager must be restarted.
Display database data for this part [show database-data for this part]:
The window shows geometric data as well as ERP data.
The script $CADENAS _SETUP/scripts/erp/show_dbdata .vbb must be activated in order to have the function Show database data for this part [show database-data for this part] available in the ERP toolbar (regardless of the view display ).
In PARTadmin -> Category Configuration files -> $CADENAS/SETUP/erpcustom.cfg -> Block [LOAD], execute the context menu command Activate on the respective key and save. (If the key does not exist, create it with a consecutive number) To make the button visible, you must PARTdataManager must be restarted.
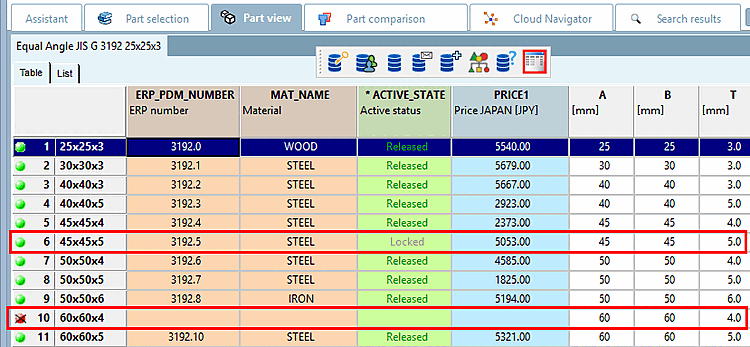
Preferred rows On/Off [Preferred rows on/off] :
When activating the function projects and directories which do not meet the preferred rows condition are hidden in the index tree and in the table the respective rows (characteristics).
Note The function only then works if the setting was made for the respective role. See examples below.
Details on defining the condition can be found under Section 5.7.5.1.2, “ Preferred series - plinkgroups.cfg -> Block [Role_name] -> Key "PREFRANGE" ”
Effect of preferred row capitalization in the table
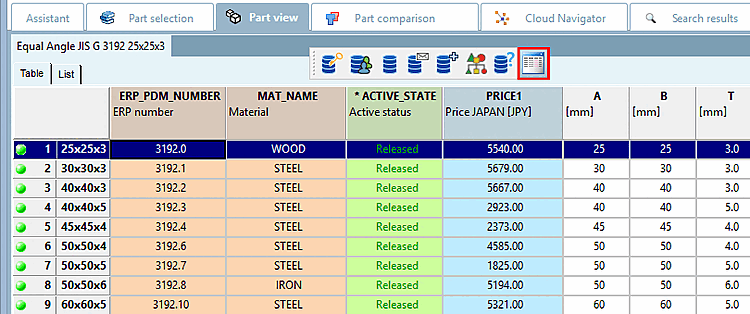
Only rows which meet the condition are displayed.
Setting in configuration file
$CADENAS_SETUP/plinkgroups.cfg[Rollenname] PREFRANGE=((ERP_PDM_NUMBER.NE.'').AND.(ACTIVE_STATE.EQ.1))Meaning: The ERP number is not empty, i.e. it exists AND the ACTIVE_STATE column has the value 1 (=released).
Setting under PARTadmin -> Category Roles -> Tab page General -> Preferred series [Preferred ranges]
Preferred rows off, all rows are displayed: Row 6 and 10 do not meet the preferred rows condition and so are hidden when the function is activated.. See next figure.
Effect of the preferred rows activation in the index tree
The directories and projects in the catalog index are always colored green or semi-transparent.[76] Green means that at least one line in a project corresponds to the condition under CONDITIONTREE or display condition for part selection [Display condition for parts selection]. Green is "inherited" upwards. Semi-transparent means that no line of any project meets the condition.
Once the preferred rows function is activated all semi-transparent projects and directories are hidden.
Setting in configuration file
$CADENAS_SETUP/plinkgroups.cfg[Rollenname] CONDITIONTREE=(LINKTABLE.ERP_PDM_NUMBER<>'') AND (ACTIVE_STATE=1)Meaning: ERP number is not equal empty, in other words available AND the column ACTIVE_STATE has the value 1 (=released).
Setting under PARTadmin -> Category Roles -> Tab page General -> Display condition for part selection [Display condition for parts selection]
If you activate the Preferred rows on/off filter, only those directories and projects are displayed that contain parts that meet the condition, i.e. the green ones.
Note Activating the preferred series function also affects the search!
The search results are filtered and must then also obey the preferred series condition. See e.g. also Section 2.1.11.10, “ Display filtered tree ” in PARTsolutions - User or Section 2.1.11, “PARTdataManager – ERP/PDM extensions ” in PARTsolutions - User.


![PARTadmin -> erpcustom.cfg -> [LOAD] -> erp_psol_mm_vars.vbb](https://webapi.partcommunity.com/service/help/latest/pages/cn/installation_ecatalogsolutions/doc/resources/img/img_bd5f99db2530424fa00f360669565472.png)

![PARTadmin -> erpcustom.cfg -> [LOAD]](https://webapi.partcommunity.com/service/help/latest/pages/cn/installation_ecatalogsolutions/doc/resources/img/img_a2f265c427314b22a6da6c0634c4473c.png)


![PARTadmin -> erpcustom.cfg -> [LOAD] -> erp_dbedit.vbb](https://webapi.partcommunity.com/service/help/latest/pages/cn/installation_ecatalogsolutions/doc/resources/img/img_4b51ee42a1f240c3b1093187c7ced5e9.png)


![PARTadmin -> erpcustom.cfg -> [LOAD] -> show_dbdata](https://webapi.partcommunity.com/service/help/latest/pages/cn/installation_ecatalogsolutions/doc/resources/img/img_614576241e0242df8538e165f7b671a2.png)


| erp_sap_showdis | Create material | ||
|
| ChangeMatButton | Change material | |
|
| DisplayMatButton | Display material | |
|
| SearchMatButton | Search material |


[75] The commands for buttons and menu entries are the same.
[76] Settings under COLORCONDITIONTREE or status colors for [Status colors for catalog index] catalog index overwrite and possibly lead to a multi-colored index tree (see Section 5.7.5.3.2, “ Status colors for catalog index - plinkgroups.cfg -> Block [role name] -> Key "COLORCONDITIONTREE<number>" ”).
Is the option under PARTlinkManager -> Extras menu [Extras] -> Configure ERP environment -> Mark [Assign linked parts in the parts selection] linked parts in the parts selection is deactivated, the catalog index is displayed in one color.