
![[Note]](https://webapi.partcommunity.com/service/help/latest/pages/cn/installation_ecatalogsolutions/doc/images/note.png) | Note |
|---|---|
Do not carry out a connected installation via a network drive, but only directly on the computer in question! | |
The standard modules PARTdataManager (parts selection/parts search) and PARTadmin (administration) are installed.
By default
the installation is carried out under C:\Program Files\PARTsolutions
Professional.
Accept the terms of the license agreement and click .
Specify the folders in which the software is to be installed.
The button allows you to select a folder on the hard disk other than the default one (if necessary).
Click when you have made your selection.
→ The second settings page of Destination Folder opens.
Adjust the paths of CADENAS DATA, CADENAS SITESETUP, CADENAS Pool and CADENAS User if necessary.
Example of the
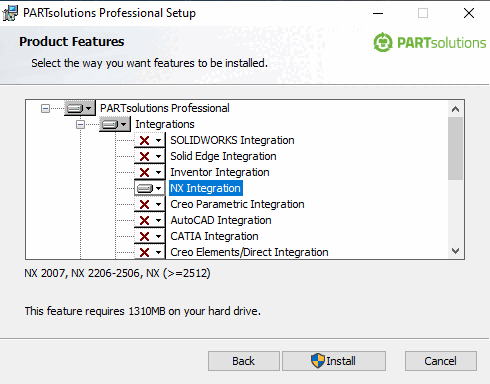
start.env: The path under CADENAS_DATA has been modified.[ENVIRONS] CADENAS=%DirOfThisFile% CADENAS_SETUP=C:\ProgramData\PARTsolutions Professional\setup CADENAS_DEFAULTUSER=$CADENAS_SETUP\user\default_user CADENAS_SITESETUP=C:\ProgramData\PARTsolutions Professional\sitesetup CADENAS_USER=%UserAppData%\PARTsolutions Professional\user CADENAS_LICENSE=$CADENAS_SITESETUP\lic CADENAS_POOL=C:\ProgramData\PARTsolutions Professional\pool CADENAS_DATA=C:\data_minimal\Integrations: Activate the integrations that you have purchased.
Activate interfaces on the client [Enable interfaces on the client]: If the CAD systems are already installed, you save yourself a manual activation if you activate the option. In PARTadmin under the [Category] "CAD integration [CAD integration]" category [Category], you can also activate it manually later. See Section 1.4.2, “ CAD integration ” in ENTERPRISE 3Dfindit (Professional) - Administration.
Batch scripts are available at
...\software\install\scripts, which can be executed locally at any time to activate/deactivate all integrations. These can also be used administratively in the course of software distribution with deployment.After the installation is complete, the corresponding start menu entries are displayed. The Activate Interfaces / Deactivate Interfaces links start the batch scripts mentioned above.
Start the installation by clicking on .
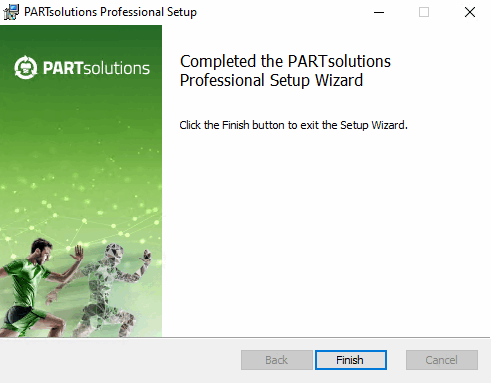
→ As soon as the installation is complete, the following dialog appears.
→ The installed programs can now be called up from the Windows menu.
Import an already received license via PARTadmin under Tabbed page Licenses > Add file... import:
Otherwise, you can apply for a license on the Apply for licenses online [Request licenses online] tab.
Details on licensing can be found under Section 1.5, “ License administration ” in ENTERPRISE 3Dfindit (Professional) - Administration.
Install the required catalogs and classifications via PARTadmin.
Details can be found under Section 1.4.3.1, “ Catalog update Online ” in ENTERPRISE 3Dfindit (Professional) - Administration.


![[Important]](https://webapi.partcommunity.com/service/help/latest/pages/cn/installation_ecatalogsolutions/doc/images/important.png)


| Note |
|---|---|
Whenever a central PARTapplicationServer is in use, it should be started as a service. Once the setup has been completed and the license has been activated, go to " | |