 |
As of version 9.05 some more functions have been added:
During the scanning process the assembly parts are automatically sorted into the following groups:
This makes sense, because based on the DocumentScan various purchineering analyses can be conducted for each group. "Make or Buy" for own parts for example or "Supplier search" for standard and supplier parts for example.
Geometries have to be imported in order for purchineering analyses to be applied to the DocumentScan.
The respective option Import geometry is displayed in the Import document structure dialog box.
If an import has been processed without geometries, then these can be imported subsequently as of version 9.05.
Therefor now you can find the context menu command Import geometry at the respective parts (icon
 ) (multiple selection with Ctrl key).
After a successful import and fingerprint generation the respective icons are shown.

The assembly to be scanned is open in the CAD system.
Basically any assembly size can be scanned. But please regard that this can be time consuming.[59]
Switch to PARTdataManager and select the Analyses index page.
In the Import document structure dialog box Structure preview is displayed. The complete structure of the assembly loaded in the CAD system is displayed.
You can perform the import of the document structure with or without geometries:
Now in the Import document structure dialog box Classify parts is displayed.
Pre-classify parts: (optionally) (new as of version 9.05)
Select the respective checkbox.
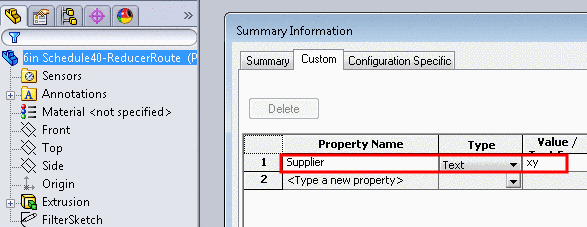
If for example the part property "Supplier" is available in the CAD system, then you can reference to it in the Purchased parts expression input field.
Insert the following expression in Fortran syntax for example. You can find explanations concerning Fortran syntax under Section 6.1.1, “Fortran Syntax ” in PARTsolutions - Administration Manual.
Supplier .NE. ''
Meaning: If the "Supplier" property field is not empty, then the respective part is classified as supplier part.
If there are certain terms such as DIN, EN, ISO, etc. in the document name, then the part is classified as standard part.
Some options are already listed via checkbox. Under Custom you can insert more terms separated by comma.
The classification process sorts the parts into the following groups during the scanning process:
Conduct purchineering analyses
Now you can conduct Purchineering analyses for any directories or projects.
Detailed notes on this are found under Section 3.1.13.1, “ Purchineering ” in PARTsolutions - User manual.
On the My parts folder Make-or-Buy Report for example, on the Supplier parts folder Find suppliers for example.


Detailed information on this is found under Section 3.1.12, “ Document scan / Analyses ” in PARTsolutions - User manual.