
The interface of the feature based Sketcher is divided into the following areas:
The tools provide the individual drawing functions for the sketcher. On this, see Section 7.9.3, “Tools ”.
Click on a button to select the tool. Then click in the drawing and carry out the design step.
The design step is recorded in the sketch history [Sketch history] on the left.
Sketch history (with construction steps/features on the left)
The sketch history [Sketch history] is a list of all design steps. You can return to each step and make changes.
Sketcher (graphics area on the right)
In the graphic area, the complete sketch with (possibly a lot of) design steps is designed.
![[Note]](https://webapi.partcommunity.com/service/help/latest/pages/cn/ecatalogsolutions/doc/images/note.png)
Note Interactive emphasis: Feature in Sketch history / 2D sketch element in Sketcher
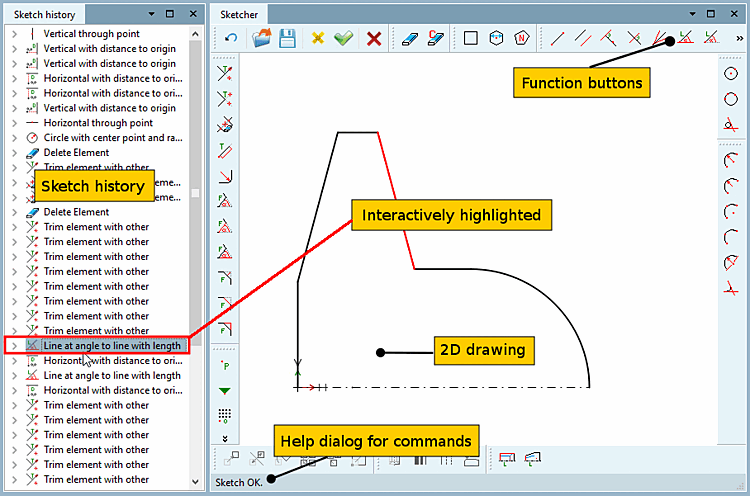
2D drawings can be very complex, i.e. contain a large number of design steps. To ensure that you don't lose track, Sketcher offers interactive highlighting.
Interactive highlighting means that each drawing element in Sketcher is linked to a specific design step in the sketch history [Sketch history]. This connection becomes clear as soon as you touch a drawing element with the mouse arrow. It is then highlighted in color and at the same time the corresponding feature line in the sketch history [Sketch history] appears with a dark background. Conversely, clicking on a feature line highlights the corresponding element in the 2D drawing. See Fig. „Sketcher user interface“.
In the status bar at the bottom left, a help dialog for commands is shown.